f

Thursday, July 31

Free Puppy Patterns # 2 - Vintage 1940's Embroidery Designs

#2 of 6 Playful Puppy Motifs - Superior Iron-on Transfers

These adorable pups are from an embroidery transfer pattern which was produced by Superior in the late 1930's / early 1940's and sold through Sears & Roebuck. This is the second installment, out of six.  

Don't you think this design would look sweet on a bib, just like in this vintage ad?


Click here for Free Puppy Patterns # 1 - Vintage 1940's Embroidery Designs


Thanks for visiting!
Lara

Tuesday, July 29

Nancy Rink's Stolen Quilts

Many of you are familiar with the wonderful quilts created by Nancy Rink, one of our most beloved designers and teachers.  
Nancy was recently victimized by thieves who broke into her studio and took at least 16 of her quilts.  This is a devastating loss, not only for Nancy, but for the Quilting Community as a whole! 


I am adding my voice to the call to keep alert for any sign of Nancy Rinks stolen quilts.  
This photo only shows three of Nancy's quilts.  Please click here to view an album of 16 of the quilts which were taken:
Sixteen Quilts Stolen from Nancy Rink's Studio 

Add your voice by passing this news on through all our social media!  As a watchful and caring community, we may be able to recover some of Nancy's quilts.   

Channeling My Inner Hippie - 241 Tote

Channeling My Inner Hippie - 241 Tote
Do you have a bag pattern that you go to over and over again?  This is one of my favorite bag patterns, because it is simple, versatile and fun to make.
Here is the link if you would like to make one of your own: 
Anna Graham 241 Tote Pattern

The main fabric I used reminded me of a sort of sepia toned Peter Max piece.
It seemed to want peace sign fabric inside.  I fooled with the pockets a little to make them different feeling by touch, always a help when a person is groping around the inside of their purse.  


Just for fun, I played with my sewing machine's fancy stitches:


Side Pocket Stitches
                  
This is a bag with a very outgoing "purse-sonality", which sometimes startles me, because I am kind of a shy person.  People seem to like it and I'm often asked where I got it.  That's one of the fun things about sewing bags, isn't it?  You know that you have created something unique.  

Here is one last photo - another recreation of the 241, which I made for my daughter.  It is done up in brown paisley corduroy, a fabric she chose when she was nine years old, for one of her many room decorating schemes.  It's an unusual fabric for a young girl to choose, but we both still love it.    I added a small top flap with a tigereye button-over-snap closure on the outside of this one and shortened the bag length a little. 


241 Tote in Corduroy, with modifications

It looks like a completely different bag, doesn't it?


Thanks for visiting!
Lara

Thursday, July 24

Definitely Not De-Kaffe!

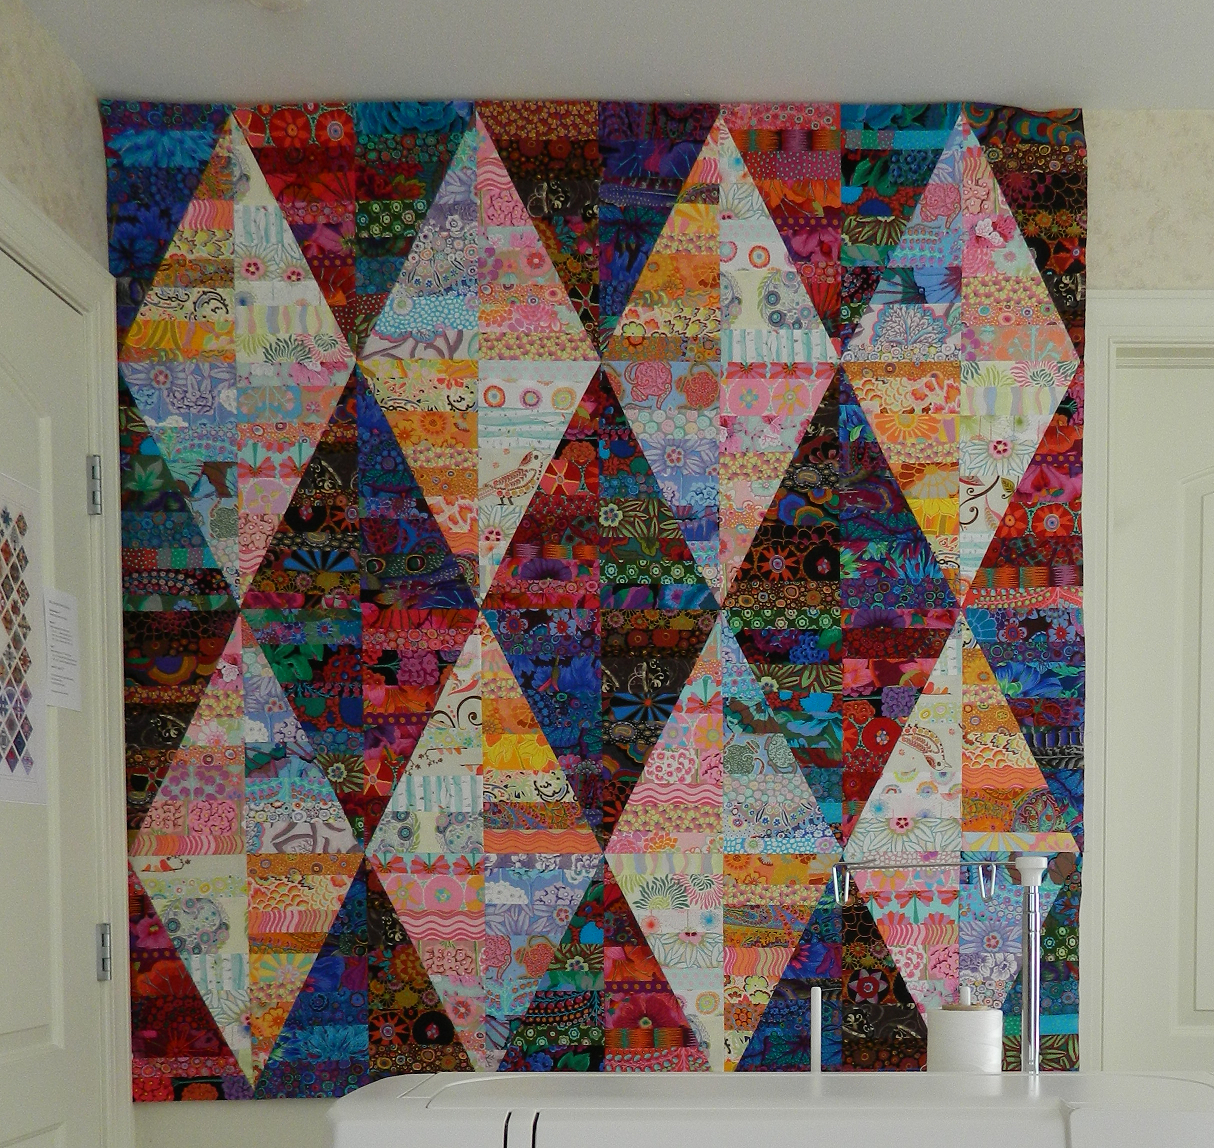
Close up of string pieced diamonds

Do you LOVE color?  If you do, and you love bold design, then it is a pretty safe bet that you love Kaffe Fassett fabrics!   

A couple of years ago my daughter Kaitie spied this quilt on the cover of Kaffe Fassett's "Simple Shapes Spectacular Quilts" book. The book caught her eye from across the store, which is easy to imagine why when it comes to Kaffe Fassett.  We both loved the pattern, which he calls Facet. I never would have been brave enough to cut all those big beautiful prints into little strips if I had not seen this book first.

Facet Quilt 

It took me a year and a half to gradually collect the fabrics. There are more than 80 different fabrics: mostly Kaffe Fassett, with some Phillip Jacobs, Tula Pink, Amy Butler and coffee themed prints thrown in. It is a diamond shaped string quilt. Not hard to make at all and lots of fun to play with all those fabrics! Can you see some of your favorites in there?

The picture below is of the quilt top while it was on the design wall, before I sewed on the zig-zaggy border.  


I had a little help from my friends: Julie DeGrave (Pines and Needles Quilting) quilted the quilt in a beautiful swirling all over design and Dawn (sewnsewer2 on The Quilting Board) made the beautiful label for us. Those of you who are Princess Bride fans know what "As You Wish" means.  


Kaitie looks pretty pleased, doesn't she?!

Tuesday, July 22

A Cake Pincushion Tutorial

It's Easy as Pie... I mean... Cake!


Cake Pincushion


Have you always wanted to make a cake of for yourself?  This pincushion might be just what you need.  

Supplies:

  • Either a mini or a standard CD.  Standard CDs measure 4.7 inches (12 cm) in diameter and will make a larger cake.  Mini CDs measure 3.1 inches (8 cm)  in diameter and will make a smaller cake.  You might also try using a canning lid, although it will slightly effect your ability to stuff the pincushion. 
  • Mat board or heavy cardboard, anything that can be cut into a rigid circle.
  • Pin cushion stuffing.  I like to use clean sawdust because it makes a nice firm pincushion, with a little heft to it, and it holds pins in very well.  Some people like to use wool, or polyfill. Ground walnut shells and bird grit would both be too shifty for this project.  
  • ¼ to ½ yard of fabric for the icing (crepe or satin lend the right look)
  • Trims that have the look of piped cake decorative frosting.  You can make a great faux frosting by ruching narrow silk or satin ribbon.  To learn how to ruche ribbon as well as make ribbon flowers, check out Connie Macfarlane’s website: http://paperpleatsandribbonroses.blogspot.com/2011/01/ruched-ribbon-technique.html
  • Ribbon flowers, either store bought or handmade, as long as they are the right size and look for frosting flowers. A goldmine of instructions for making more ribbon flowers is here: http://tipnut.com/ribbon-flowers/  Just make them in miniature.
  • Lace with a doily like look to sew or glue under the bottom edge of the cake
  • Matching thread for ribbons and cake fabric
  • Clear, strong, fast drying glue.  (I highly recommend Fabri-tac Permanent Adhesive)
  • Glass head straight pins, for decorating the cake and for sticking in the top of your finished pincushion.  
  • Optional - A small plate, saucer, or pedestal dish that you would like to glue the finished pincushion onto.  (A fellow Quilting Board member told me that she used a pillar candle pedestal - a great idea!)

Instructions:

1.  Using your CD (or lid) of choice as the template, trace and cut out a circle from the mat board.
2. For your fabric, follow the cutting directions as shown in Diagram A, below (NOTE: this is not a “drawn to scale” pattern, just instructions on how to make your own.)

Diagram A for Cake Pincushion

3.  Cake Bottom. 
Baste two circles of stitches around the outer edge of the Cake Bottom fabric, leaving long threads at start and finish.  Center the mat board circle on the wrong side of the cake bottom fabric.  (Diagram B) 
Gather the outer edge of the cake bottom around the mat board, adjusting gathers until you have a snug fit without bending the mat board.  Check to make sure the right side of the fabric is nice and flat.  Tie off the threads and trim.  (Diagram C)  Set aside.

Diagrams B and C for Cake Pincushion

4.  Cake Sides.  
Baste two lines of stitching along the bottom edge of the Cake Sides.
Staystitch a little less than ¼” along the top edge of the side.  With right sides together, match up the two ends and stitch them together with a ¼” seam to create a cylinder.  Shown below in Diagram D and E.

Diagrams D and E for Cake Pincushion

5. Cake Top.  Pin the Cake Top fabric onto the top edge of the Cake Sides cylinder.  (Right sides together)  Baste and then hand sew the top to the sides making V-shaped clips into the fabric around the curves.  Turn the Top and Sides right side out.  (Diagrams F and G)

Diagrams F and G for Cake Pincushion

6.  Now it’s time for the cake filling.  Flip the cake over like a cup and pack it firmly with the stuffing of your choice.  Be careful not to strain the seams, but make it good and firm.   Fill it up to ¾” from the edge of the cake cup.  

7.  Take your CD or lid and lay it on top of the filling, using it to push the filling down.  Remove it and see if you can fit in more filling.  When you think you’ve got at full as you can without straining seams, place the CD or canning lid back on the filling again.  If you are using a CD, the center hole will allow more fillng to be added or taken out as need be.  When you are happy, put a piece of tape over the hole so the filing doesn’t leak out. 

8. Using the two lines of basting on the bottom edge of the cake, gather the Cake Sides tightly around the CD/CL.  Make sure the cake sides are nice and smooth and straight.  Adjust the gathering evenly around the CD/CL.  The bottom of the cake should look like Diagram C.  Secure and tie off the threads. 

9.  Fetch that cake bottom you set aside.  With the wrong sides together, sew or glue it to the CD/CL bottom of the cake, making sure the gathering is still evenly distributed.

10.  Now comes the really fun part.  Lay out the trims and flowers you either bought or created.  Sew and/or glue them to your cake as if you were decorating with icing.   Try to decorate with them like someone would decorate a real cake.  Add small pins as icing dots too.  Add lace around the bottom edge so it looks like the cake is sitting on a paper baker’s doily.   As a final touch you can glue your cake pincushion to a pretty plate or pedestal. 


Finished!  Cake pincushion trimmed with ribbon flowers, lace and pins.

Wednesday, July 16

Carolina Byways Miniature Quilt - with link to free pattern

"Carolina Byways".... Isn't that a great name for a quilt?
It brings to my mind the wonderful times we had meandering through the Great Smoky Mountains, where my Grandma delighted in getting us lost, just so we could spend more time there.  

Carolina Byways is a split nine-patch quilt created by Janet Wickell and she has offered it as a Free Pattern!  Her quilt is made with 6" blocks and she also has instructions available for a miniature version with 3" blocks.  I made the mini - so each square you see in the photos is 1". (There are nine squares, arranged 3 x 3 in each nine-patch block.)  I also didn't follow Janet's pattern exactly and changed the way my nine-patches were split.

Which usually comes first for you?  Do you start with fabric you love and then search for, or create, a pattern?  Or do you find a pattern you just have to make and then look for the fabrics?  In the case of this quilt, I fell in love with Barbara Brackman's Morris & Company fabrics and then looked for a way to use them in a mini quilt.  They spoke of the woodlands to me:


Morris & Company fabrics

I played around with the fabrics and the layout of the squares before sewing them all together.  You can see how I made the more distant mountains blue and the closer ones look like they were just starting to be touched by Autumn.  I wanted my mountains to look like the morning mist was still lingering, so added light colors along the ridges. It is pretty easy to end up with something you love when you work with such a beautifully designed collection.

Here is what it looked like when I had the final layout up on the design wall, but hadn't sewn them together yet.  You can see that my nine-patch blocks are split wherever it looked best, and not in the traditional way.  I think it gave the mountains a more natural feel. I also added 1 extra row of squares to both the width and the height... in a way, this became a postage stamp quilt with HSTs (half square triangles).


Carolina Byways - playing with the patches before sewing


Here is the final quilt, with a mitered border framing it: 


Carolina Byways Mini Quilt


And of course, I had to make a pretty label for the back.  The leafy border is from our garden:


Linking up to Quilt Story / Fabric Tuesday.  

Thanks for visiting!
Lara


Tuesday, July 15

Another Ridiculously Easy Favorite - Caprese Salad

- by Alina B.

Another quick, tasty, veggie, summer dish. Caprese salad - best if you are lucky enough to grow fresh basil yourself - is a family favorite. I wouldn't normally think of this as a "recipe" so to speak, but before my husband met me, he had never heard of caprese salad. So I figured maybe other people have been missing out on this great meal, too!

Slice some tomatoes and layer with fresh mozzarella and basil leaves. Drizzle olive oil and balsamic vinaigrette over the top and finish with fresh ground salt and pepper. I like to use burrata mozzarella, because it's creamy in the middle, and fig balsamic vinaigrette. It just makes this simple meal seem that much more decadent. Buon appetito!

Caprese Salad


Sunday, July 13

DIY Ironing Board & Cutting Station Tutorial

- by Lara & Jim B.


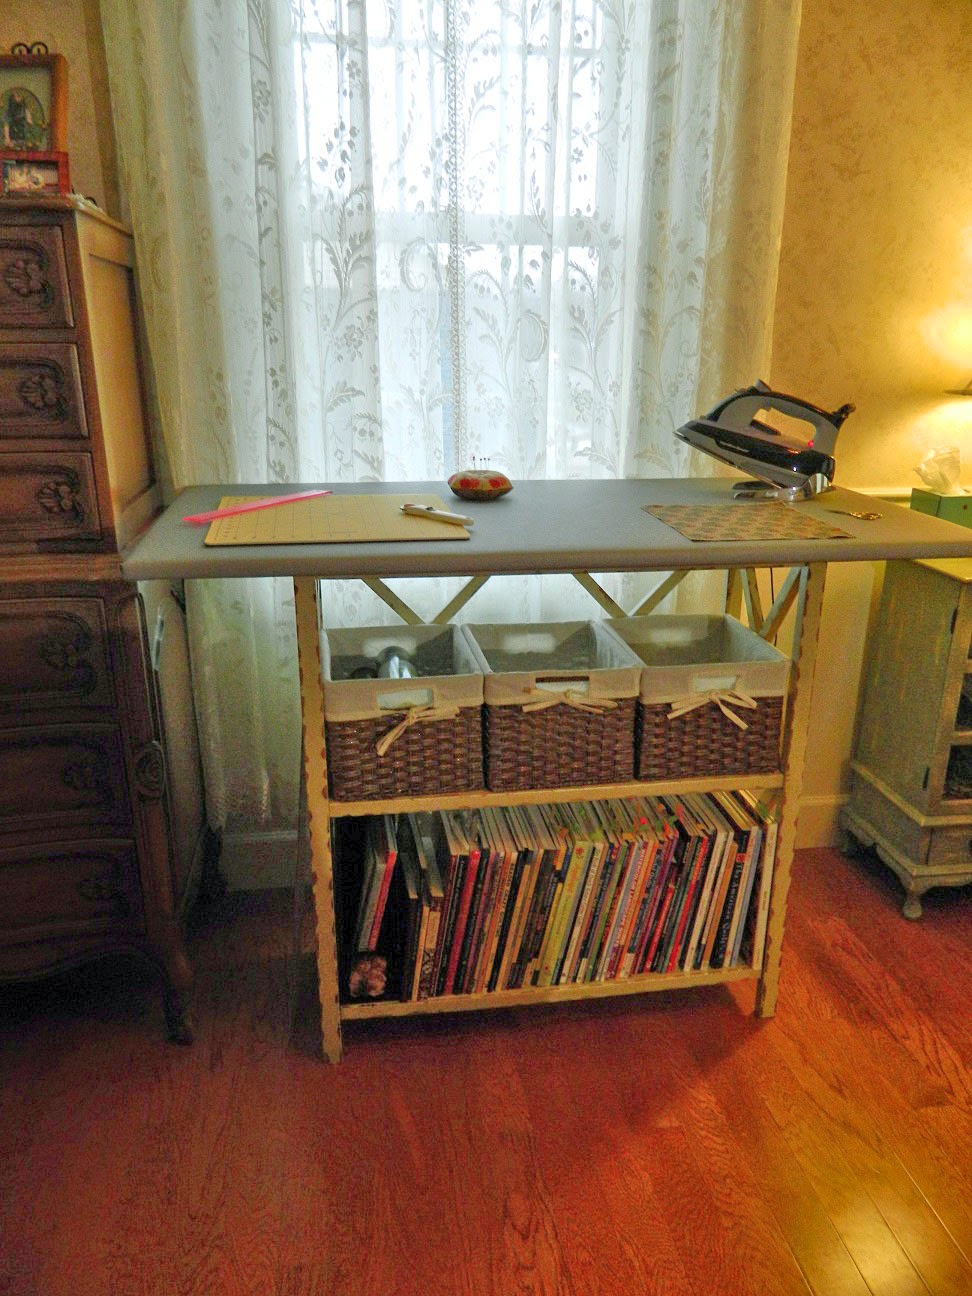
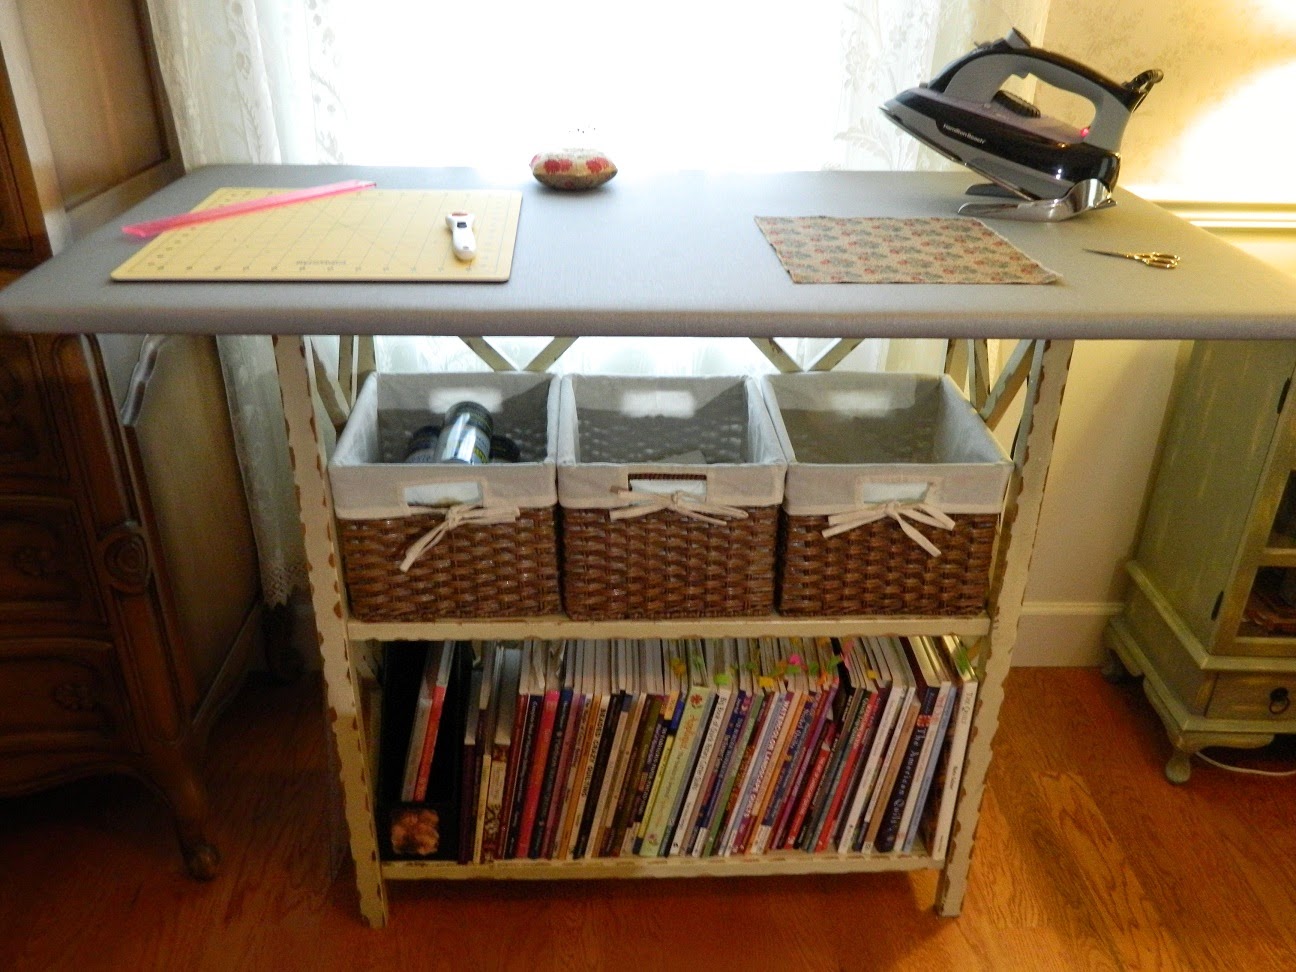
DIY Ironing Board & Cutting Station

Are you tired of your too low, too wobbly, too thin old ironing board?  Does your back ache after long sessions of ironing?  Even the largest, store bought ironing boards are rarely more than 18 inches wide.  Have you ever thought about making your own bigger and better ironing board?

After putting our heads together to do just that, we decided to make our new ironing board as comfortable and multifunctional as possible.  We wanted the board to be at least 24" x 48”: long enough to accommodate the whole width of quilting fabric and wide enough for a big cutting mat - so the board would make a nice height for a cutting station as well.  We also wanted the unit to serve as a bookshelf and to hold supplies, so we started with a 36” tall bookcase for a base.

This is how we built our own, homemade ironing station:

Supplies:
·       1 bookshelf or other sturdy base, in your preferred ironing height. 
·       1 quarter sheet of 3/4 inch thick plywood (24" x 48")
·       1¼ yards of 45” wide Insul-bright fabric
·       2 yards of cotton batting (Do not use polyester batting – it melts!)
·       1½ yards of heavy cotton duck or canvas fabric
·       2 yards of silver ironing board fabric with an aluminized coating (we found it at JoAnn Fabrics)

Tools and Supplies:
·       Two pairs of scissors: one pair for fabric and batting and the other a not so nice pair for cutting through the fabrics with a metallic layer.
·       Staple gun and staples
·       White school glue
·       Drill
·       Four to six 1 inch long screws
·       Hammer (I always have my trusty hammer at the ready)

Instructions:

1.  Measure the top of the bookshelf.  This size will become the shelf’s footprint. 
2.  On the underside of the ¾” plywood, center and draw out the shelf footprint.
3.  Cut a whole piece of Insul-bright to fit exactly on the top of the plywood.  Set aside.
4.  Flip the plywood over to the topside and lay a fine line of white school glue around the perimeter. 
5.  Lay the piece of Insul-bright on top of the plywood, shiny side up, and aligned perfectly with the edges of the wood.  Let the glue set for a little while.
 
Diagram of Layers

Each of the next layers will need to be cut consecutively larger as you staple each one around the plywood.  The method to use for applying each layer is as follows:
 
6.  Place the material wrong side up on your work surface.  Smooth it out, so that it lies perfectly flat. 
7.  Center the plywood over the piece, padded side down.
8.  Wrap the material up and around the edge of the wood.  Staple gun the material onto the underside of the plywood.  Work in a symmetrical pattern around all four sides, make sure that the material is pulled very tight, yet not stretched so much that it distorts, and keep your staples in nice straight line, parallel to the edge of the plywood.  Do not staple past the bookshelf footprint that you drew on the underside of the plywood earlier.  The only layer that should extend over the footprint is the silver ironing board fabric.
9.  Miter the corners as if you were gift wrapping a box.


This is the order in which to apply the layers (after you have applied the Insul-bright)
·       2 layers of cotton batting.  One should be approximately 28” x 52” and the other should be approximately 29” x 53”. 
·       1 layer of heavy cotton duck or canvas approximately 30” x 54”
·       1 layer of silver, aluminized ironing board fabric, cut large enough to extend slightly past the shelf footprint when folded around the edges. 


Once all the layers are stapled to the plywood, it is ready to be attached to the base.  Predrill holes near each corner of top shelf of your base.  Center the ironing board over the shelf.  Hold in place and screw the plywood top to the top of the bookcase from underneath.

We are both thrilled with the board. It cost far less than buying a large, premade ironing and cutting station.  It has made a very big difference, not just in how long we can work without backache, but its size speeds up so many processes and the padding materials help the iron remove wrinkles much more quickly. 

Finished!


Wednesday, July 9

Free Puppy Patterns # 1 - Vintage 1940's Embroidery Designs

When our kids were small and we attended open houses at school, I used to draw a puppy a lot like this and leave it in their desks with an "I Love You" note.  I had forgotten about doing that, until this old pattern brought that memory back.  
These pups are from an embroidery transfer pattern which was produced by Superior in the late 1930's / early 1940's and sold through Sears & Roebuck.  They were most likely intended to be used on tea towels, but would be wonderful on any number of items. They are just too darn cute not to share! 

So here is the first installment, out of six.  I still have to take the time to clean up and reproduce the rest:


#1 of 6 Playful Puppy Motifs - Superior Iron-on Transfers


Now, I did a little research to learn how you could use this image to embroider.  Obviously the pattern could be traced onto your fabric.  I never get that exactly right though.  Since you don't have the actual iron-on transfer, wouldn't it be great if there was a way to print the pattern and transfer it to fabric? 
Well there is!  I bet some of you already know this, but there is a product called Transfer-Eze that does the trick. It is a water soluble film that you can print or photocopy patterns onto.  You apply it to your fabric and voila! you're ready to stitch.
So naturally, I wanted to learn more and found the most thorough discussion on Mary Corbet's Needle 'n Thread blog.  Her website is a treasure trove!

What are some ways you would use these puppy patterns? I bet you have great ideas!

I found the sweetest vintage sewing pattern for a jumper from the late 1970's.  (It's always a bit of a shock to be reminded that I am "vintage"...hah!) For those of you from the UK, when Americans use the word "jumper" we don't mean a knit sweater.  A jumper is what we call a pullover dress with no sleeves.
This jumper below, in the left corner, is what I plan to embroider with one of the pups. i haven't figured out what color or kind of background fabric to use.  The yellow gingham is sure sweet, but then i don't know if the pup would show up very well against a patterned fabric.  If anybody has suggestions about what would work well, I would love to hear them!   


Puppy Jumper - Simplicity 9211


Thanks for visiting!
Lara
  

Tuesday, July 8

Sam's Woolly Flannel Quilt

It's Sam's turn next to receive a quilt.  He likes dark colors and soft textures, so this was the perfect fabric collection for his quilt. 


Moda Wool & Needle Flannels


He's not into fussy looking things, so he chose a very simple 9 patch block.  


These measurements do not include the seam allowances


Every other block will alternate the positions of the lighter and darker colors.  Sam chose charcoal satin for the binding.  This is the mockup for the couch sized quilt we eventually want to end up with:

Sam's Wooly Flannel Quilt - 71 x 53 inches - 6 inch blocks

I've made a good start on the blocks, but keep having to set the project aside to work on other things. This fabric is wonderful to work with because it is so soft to the touch and has no problems with pilling, even after prewashing.  

The prospect of making my own satin binding has me a little concerned.  If anybody has some tips on the best way to do this, I'd love some advice!


Thanks for visiting!
Lara

Saturday, July 5

Avocado Toast with Poached Eggs

- by Alina B.

My husband and I love this dish. It's pretty fast, cheap, and delicious. It's our favorite weekend breakfast. If you're like me and didn't know how to poach an egg, I included the instructions for how I do it. It took me a few failed attempts at first, but now it's fairly easy. Enjoy!

Instructions:

Spread some mayonnaise on whole wheat toast (we like to use Vegenaise, but not because we don't eat eggs - obviously - it just tastes better!). Top with slices of ripe avocado. We use about a quarter of an avocado per serving. Top with a poached egg, fresh cracked pepper, and a pinch of salt.

How to poach an egg:

Fill a small pot about half way with water and bring to a boil. Once it has boiled, turn the temperature down until it is barely simmering. Add a few dashes of white wine vinegar to the water - it helps keep the eggs whites together. Crack an egg into a small, shallow glass. Pour the egg from the glass very slowly into the pot. Gently push the egg whites closer to the yoke with a spoon. Let sit for two to three minutes. The longer it sits, the less runny the yoke will be, so it's a matter of personal preference. Remove with a slotted spoon and gently shake off any excess water before topping your toast.


Thursday, July 3

Bluebird Applique – free pattern!

They say that the bluebird carries the sky on his back.  I like that thought.


Last year, I created this little bluebird for my sister-in-law.  I thought it would be fun to turn it into a pattern to share here on BuzzinBumble.

Bluebird Applique Pattern


This is a pattern for raw edge applique.  It could also be used for needle turned applique if you add a little turn under allowance around the edges of each piece. 

I have left the bird’s eye, beak, and feet as a part of the whole pattern.  I worked with them as a whole and drew them onto the fabric before cutting out the shapes.  For the birdy feet, I partially drew them onto the fencepost on which my bird perches.  You can also cut these parts from separate fabrics. 

Batik fabrics work very well, because you can fussy cut elements that have the look of feathers.  I took it a step further by using Derwent Inktense Pencils to add details, colors, and shading.  They are really fun to work with and become a permanent part of the fabric.

Please feel free to use this pattern.  I would love to hear what you think! 


Bluebird Applique